There are some recipes you don’t really learn so much as absorb. They get made so often that measurements turn into instincts, steps blur together, and before you know it, you’re baking on muscle memory alone. These cherry cheesecake bars are one of those recipes. I’ve made them so many times I barely look at the box anymore—and somehow they come out perfect every single time.
They’re the kind of dessert that feels like it’s always existed. Familiar, comforting, and generous. The sort of thing you’d find on a folding table at a church potluck, wrapped in foil and already missing a corner because someone couldn’t wait. Simple enough for a weeknight, good enough for a celebration, and forgiving enough that you can make them half-asleep and still look like you know what you’re doing.
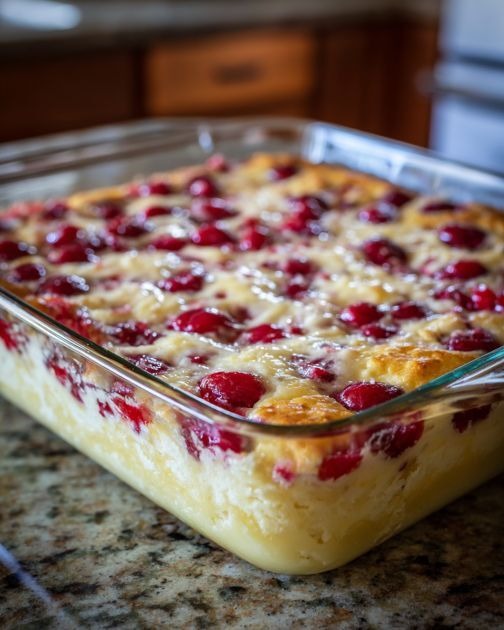
At the heart of it all are just three main ingredients. Not the kind of “three ingredients” that secretly require five specialty items and a stand mixer. Truly simple. Yellow cake mix. Cream cheese. Cherry pie filling. Everything else is already sitting in your kitchen, waiting for a reason to be used.
That’s the magic of it.
You don’t need a mixer. You don’t need precision. You don’t even need confidence. You stir, press, spread, bake, and somehow end up with a buttery crust, a creamy cheesecake layer, and that glossy, ruby-red cherry topping that makes people’s eyes light up before they’ve even taken a bite.
This recipe makes enough for two pans, which is part of its charm. One for your house, one for someone else. Or one for now and one for later. Or one for the table and one mysteriously missing slices from the fridge at midnight. It was never meant to be stingy.
Why these bars work so well is because they don’t try to be impressive. They’re nostalgic without being outdated. Sweet without being heavy. Rich without being fussy. And they hit that rare balance where kids love them, adults love them, and nobody asks what’s in them—they just ask for the recipe.
The three ingredients do most of the work. A standard box of yellow cake mix becomes both the crust and the structure. Full-fat cream cheese gives you that smooth, slightly tangy middle that sets just enough to slice cleanly. And a can of cherry pie filling brings brightness, sweetness, and that unmistakable “dessert table classic” look.
To make them, you start by heating the oven and greasing your dishes. Glass works best here—not because it’s fancy, but because it bakes evenly and looks nice enough to gift without transferring anything. Two 8×8 dishes are ideal, but a single 9×13 works just as well if you want everything in one place.
In a single bowl, you mix the cake mix with melted butter, an egg, and a pinch of salt. That’s it. Stir until crumbly, not smooth. This isn’t cake batter; it’s more like damp sand that holds together when pressed. Overmixing is the only real way to mess this up, and even then it’ll probably still be fine.
Press the mixture firmly into the bottom of the dishes. Use your hands, a spatula, or the bottom of a glass. Don’t worry about perfection. Just get an even layer that reaches the edges.
Next comes the cream cheese. If you remembered to soften it, spreading will be easy. If you didn’t, give it a minute and work with it anyway. Smooth it out into a single layer over the crust. It doesn’t have to be flawless—once it bakes, it all settles together.
Then comes the cherries. Spoon the pie filling gently over the cream cheese, letting it spread naturally. Leave a small border if you like clean edges, or swirl it slightly with a knife if you prefer a marbled look. Either way, it will bake into something beautiful.
Into the oven they go for about half an hour. You’re looking for lightly golden edges and a center that’s set but not stiff. When they come out, they’ll still have a slight jiggle. That’s exactly what you want.
Cooling matters here. Let them come to room temperature, then chill them for a couple of hours. This is what gives you clean slices instead of messy scoops. The wait is worth it.
Once chilled, cut them into squares and watch what happens when you put them out. People will circle back for seconds. Someone will ask if they can take a few home. Someone else will quietly wrap one in a napkin “for later.”
They’re perfect with coffee, especially something strong and bitter that cuts the sweetness. Kids love them straight from the fridge after school. They hold up beautifully on dessert tables, don’t need forks if you cut them right, and somehow taste even better the next day.
They also freeze well. Slice them, wrap them individually, and you’ve got a stash of ready-made comfort waiting for a hard day. Thaw in the fridge and they’re as good as new.
But the real reason these bars keep getting made has nothing to do with convenience.
They’re a gesture.
They say “I thought of you” without requiring a speech. They’re what you bring when someone’s had a rough week, or a baby, or a loss. They’re what you make when you don’t know what else to do but still want to show up with something warm and sweet.
There’s no perfection required here. No exact measurements. No pressure. Just enough for two pans, because good baking has always understood one simple truth: it’s better when there’s extra to share.
And once you’ve made them a few times, you won’t measure anymore either. You’ll just know.
Leave a Reply